Aside from tacos, my other food addiction is pizza. I grew up on the stuff. It’s like a drug. I want it all the time. Who doesn’t love the stuff?? Never in a million years did I think I’d be able to get a thin crust pizza out of my oven that looked like something you’d get from an actual professional pizza parlor with a 1400degree oven. I was wrong — so very wrong.

This pizza is so damn good, you guys — seriously. So damn good. The only thing you need to make sure you have is a pizza stone, and you can find those anywhere. They’re worth having — I use mine all the time, not just for pizza. You could use the flat bottom of a very large overturned cookie sheet, but honestly, a pizza stone is better. When you remove the pizza from the oven and leave it on the pizza stone to cool for a few minutes, it continues to crisp up without burning and it’s just effing unreal. This crust you guys, is EVERYTHING. Crackly, crispy, chewy, and perfect. You could get this dough even thinner by dividing it into thirds instead of halving it. All purpose flour will not work here folks, you NEED a high-protein flour for this recipe. Bread flour is what you have to use. It provides that artisanal chew and rustic pizza crust that you’re used to seeing at actual brick oven pizza shops. It also allows the dough to be sturdier so when you lift a slice it doesn’t flop over like an old flacid man — pause.
I can’t really stress how incredible easy this whole recipe is, but there is one setback — you have to wait at least 24 hours to bake it. The 24 hour chill leads to less rise, a more flexible dough that holds its shape, and a thinner (and more flavorful) final crust. I made my dough Thursday night, baked my first pie Saturday, and another one Sunday morning as a breakfast pizza (which was yummy). When you’re ready to bake it, it needs 1 hour to sit out and relax so that it’s easy to work with.
Most importantly — this pizza gets baked directly under a turned off broiler, instead of the bottom of the oven like you’re used to. Why? Because the heat will now hit the top of the pizza cooking the toppings before the crust overcooks.
Get ready to have some incredible pie, you guys 😉

I weighed my dough for perfection, but if you don’t have a scale, just do a dip-n-sweep for 3 cups of bread flour.

Mix it all up. Shape it into a ball, put it into a greased bowl and slide it in the fridge for AT LEAST 24 hours, and up to 3 days.

24 hours (or more) later, divide the dough in half. Place your pizza stone on the top oven rack directly under your broiler. Turn the oven on to 500 degrees and allow to get super hot for one hour. Gently shape into a ball on a foil lined baking sheet covered in a little vegetable oil, wrapped in plastic. Let this rest for one hour while the oven heats. Prep your other ingredients.

Microwaving the pepperoni helps render excess fat so you don’t have a super oily pizza. If you decide to use spicy Italian sausage (like I did), make sure you cook them down first until most of their oil is release and they’re browned. If you don’t precook the meat, it will release all of its oil onto your pizza and cause it to be extremely greasy, not to mention all of that oil dripping off the sides will make a huge mess in your oven.

After an hour, the dough can be shaped. It’s easier to do this on top of parchment paper because you’ll be able to easily slide the pizza on and off the baking sheet. Just make sure you trim the edges so there’s a 2 inch perimeter around the dough to easily grab. Parchment paper tends to crumble after it’s been heated thru, so make sure you give yourself enough room to gently lift the pizza off the hot baking sheet when it’s done. Parchment can also burn, so make sure it’s not wildly hanging off the edges either. GENTLY use your fingers to stretch the dough out, turn it, use your knuckles — whatever gentle method you use to shape dough. DO NOT use a rolling pin for this dough. I simply lifted the dough from one side with two hands to let it fall and stretch, then I quickly moved my hands clockwise to repeat until I got a nice stretched out situation. Then I used the tips of my fingers to further push out the dough and it worked great. I sprinkled a little cornmeal under the pizza dough for texture — semolina flour would also work great. You don’t need these though.

All ready

Here’s how high your pizza should be. This is the very top rack of my oven, its about 6 inches below the broiler and the heat is reflecting from the top of the oven to the top of the pizza for more even and amazing cooking. You can also see how I trimmed the parchment around the pizza.

All done. You have to try this recipe, the dough is awesome.


Look at that crust!


Delicious and easy!
Print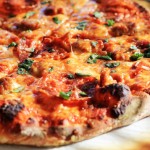
Thin Crust Pizza
- Total Time: 26 hours 12 mins
- Yield: 2 13-inch pizzas
Description
adapted from Cook’s Illustrated
Ingredients
Dough
- 3 cups (16 1/2 ounces) bread flour, plus more for work surface (see note)
- 2 teaspoons sugar
- 1/2 teaspoon instant or rapid-rise yeast
- 1 1/3 cups ice water (about 10 1/2 ounces) (see note)
- 1 tablespoon vegetable oil, plus more for work surface
- 1 1/2 teaspoons table salt
Sauce
- 1 (28-ounce) can whole peeled tomatoes, drained and liquid discarded
- 1 tablespoon extra-virgin olive oil
- 1 teaspoon red wine vinegar
- 2 medium garlic cloves, minced or pressed through garlic press (about 2 teaspoons)
- 1 small shallot, minced (optional)
- 1/4 teaspoon crushed red pepper (optional)
- 1 teaspoon table salt
- 1 teaspoon dried oregano
- 1/4 teaspoon ground black pepper
Cheese
- 1 ounce finely grated Parmesan cheese (about 1/2 cup)
- 8 ounces whole milk mozzarella, shredded (about 2 cups)
Instructions
FOR THE DOUGH:
- In food processor fitted with metal blade, process flour, sugar, and yeast until combined, about 2 seconds. With machine running, slowly add water through feed tube; process until dough is just combined and no dry flour remains, about 10 seconds. Let dough stand 10 minutes. I used my stand mixer with paddle attachment for this dough and got amazing results as well. I tried to use the dough hook but it wasn’t really working for me.
- Add oil and salt to dough and process until dough forms satiny, sticky ball that clears sides of workbowl, 30 to 60 seconds. Remove dough from bowl and knead briefly on lightly oiled countertop until smooth, about 1 minute. Shape dough into tight ball and place in large, lightly oiled bowl. Cover tightly with plastic wrap and refrigerate for at least 24 hours and up to 3 days.
FOR THE SAUCE:
- Process all ingredients in food processor until smooth, about 30 seconds. Transfer to medium bowl or container and refrigerate until ready to use.
TO BAKE THE PIZZA:
- One hour before baking pizza, adjust oven rack to second highest position (rack should be about 4 to 5 inches below broiler), set pizza stone on rack, and heat oven to 500 degrees. Remove dough from refrigerator and divide in half. Shape each half into smooth, tight ball. Place on lightly oiled baking sheet, spacing them at least 3 inches apart; cover loosely with plastic wrap coated with nonstick cooking spray; let stand for 1 hour.
- Coat 1 ball of dough generously with flour and place on well-floured countertop. Using fingertips, gently flatten into 8-inch disk, leaving 1 inch of outer edge slightly thicker than center. Using hands, gently stretch disk into 12-inch round, working along edges and giving disk quarter turns as you stretch. Transfer dough to well-floured peel and stretch into 13-inch round. Using back of spoon or ladle, spread 1/2 cup tomato sauce in thin layer over surface of dough, leaving 1/4-inch border around edge. Sprinkle 1/4 cup Parmesan evenly over sauce, followed by 1 cup mozzarella. Slide pizza carefully onto stone and bake until crust is well browned and cheese is bubbly and beginning to brown, 10 to 12 minutes, rotating pizza halfway through. Remove pizza and place on wire rack for 5 minutes before slicing and serving. Repeat step 5 to shape, top, and bake second pizza.
Notes
TOPPING TIPS: Additional toppings are always an option–provided they’re prepared correctly and added judiciously. (An overloaded pie will bake up soggy.) Here are a few guidelines for how to handle different types of toppings…
Hearty vegetables – Aim for a maximum of 6 ounces per pie, spread out in a single layer. Vegetables such as onions, peppers, and mushrooms should be thinly sliced and lightly sautéed (or microwaved for a minute or two along with a little olive oil) before using.
Delicate vegetables and herbs – Leafy greens and herbs like spinach and basil are best placed beneath the cheese to protect them or added raw to the fully cooked pizza.
Meats – Proteins (no more than 4 ounces per pie) should be precooked and drained to remove excess fat. We like to poach meats like sausage (broken up into 1/2-inch chunks), pepperoni, or ground beef for 4 to 5 minutes in a wide skillet along with 1/4 cup of water, which helps to render the fat while keeping the meat moist.
- Prep Time: 26 hours
- Cook Time: 12 mins

[…] that anyone can make it. My second favorite is definitely a heart shaped pizza. My favorite recipe here. The only adjustment I make is to shape the dough in the form of a […]
I made this today, well, this weekend. Greatest pizza recipe ever! It’s a bit of work, but the result is definitely worth the effort. Thank you!
★★★★★
This is my 4th Carnal Dish recipe that I’ve tried….and of course it was awesome! The pizza tasted like it came straight from a brick oven. Last week I made the deep dish pizza but this one for me is much better and will be my go to recipe. The only change I would make is reducing the salt in the sauce to 1/2-3/4 teaspoon.
Thanks for sharing 🙂
Do you think using whole wheat flour will work in this recipe? And is a pizza stone a requirement?
I’m not sure whole wheat flour would work in the measurements provided, but I’m sure you can adjust it to suit your needs. The pizza stone really helps but if you don’t have one, you can use the bottom of a large baking sheet so that it’s flat. just make sure it’s big enough to hold your pizza and not flop over. Keep it in the oven so that it gets hot just like you would the pizza stone.
This looks the bomb! I have never owned a pizza stone before. Do you have a brand that you recommend?